Essential Tools and Tips for Flawless Crown Molding Repairs at Home
Crown molding adds elegance and charm to any room, but over time it may suffer from cracks, dents, or loose sections. Instead of hiring a professional, you can achieve flawless repairs yourself with the right tools and techniques. This guide will walk you through essential tools and helpful tips to make your DIY crown molding repairs look professional and seamless.
Gathering the Right Tools for Crown Molding Repairs
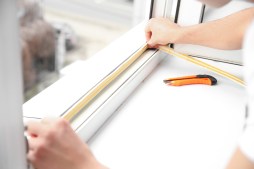
Before starting your crown molding repair project, it’s important to have the proper tools on hand. Key items include a utility knife for cutting damaged sections cleanly, wood filler or caulk to fill gaps and cracks, a putty knife for smooth application, painter’s tape to protect adjacent walls and ceilings during touch-ups, sandpaper (medium and fine grit) for smoothing surfaces after filling repairs, a miter saw or handsaw if you need to replace sections accurately, clamps to hold pieces in place while drying, and high-quality paint or stain that matches your existing molding finish. Having these tools ready ensures efficient work with professional results.
Identifying Common Types of Crown Molding Damage
Understanding the type of damage is crucial before you begin repairs. Common issues include small surface cracks caused by temperature changes or settling; dents and holes from accidental bumps; separation at joints where two pieces meet due to humidity fluctuations; peeling paint; or broken segments requiring replacement. Assessing whether damage is superficial or structural helps determine if simple filling is enough or if partial section replacement is needed.
Step-by-Step Process for Repairing Cracks and Gaps
For minor cracks or gaps between moldings: start by cleaning the area thoroughly with a damp cloth to remove dust. Next, apply painter’s tape along edges bordering walls or ceilings to keep lines neat. Use wood filler or paintable caulk to fill in cracks smoothly using a putty knife—ensure excess filler is removed immediately so it blends well once dry. After drying completely per product instructions (usually several hours), sand gently with fine-grit sandpaper until flush with surrounding surfaces. Finally, touch up paint matching your crown molding color precisely using a fine brush for a flawless finish.
Repairing Larger Damage: Replacing Sections Safely
If parts of your crown molding are broken beyond repair: carefully remove the damaged section using a utility knife followed by gentle prying with a putty knife or small pry bar avoiding wall damage underneath. Measure the removed segment accurately then cut new crown molding matching style and dimensions using precise miters on corners where applicable. Attach replacement pieces securely with finishing nails spaced evenly along length; countersink nails slightly below surface level then fill holes with wood putty before sanding smooth once dry. Finish by painting over repaired areas blending seamlessly into existing trim work.
Finishing Touches for Professional-Looking Results
To ensure your repair looks as good as new consider priming repaired spots before painting especially on bare wood areas which improves adhesion significantly. Use high-quality brushes designed specifically for trim work providing clean edges without streaks or bristles left behind during application. Remove painter’s tape carefully while paint is still slightly tacky preventing peeling freshly painted edges inadvertently later on as this technique yields crisp lines typical in professional jobs.
With patience, attention to detail, and these essential tools plus tips at your disposal you can confidently undertake DIY crown molding repairs that boast professional quality without breaking the bank on contractors—restoring elegance back into any living space effortlessly.
This text was generated using a large language model, and select text has been reviewed and moderated for purposes such as readability.